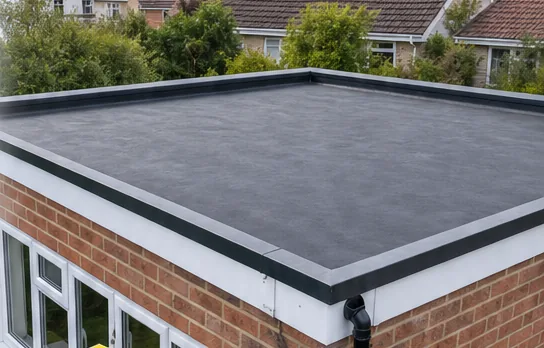
EPDM rubber roofing is a single-ply membrane, which means one sheet of synthetic rubber does the work of keeping water out. The name stands for ethylene propylene diene monomer, the compound the rubber is made from. On a domestic flat roof, such as a kitchen extension, a garage or a dormer, the sheet is rolled out over the prepared deck, glued down and turned up the surrounding walls. Because it arrives in large pieces, a small roof can often be covered with no seam across the open area. This guide explains how the system is built up, how it behaves over the years, and how to judge whether it is the right covering for your roof.
What the membrane actually is
EPDM is vulcanised rubber, the same family of material used for car door seals and pond liners. It is manufactured in a factory as a flat black sheet, commonly 1.2 mm or 1.5 mm thick, and delivered to site on a roll. The rubber stays flexible in frost and in summer heat, so it does not go brittle and crack in the way some older bitumen coverings do. It is also UV stable, which is why an exposed membrane can sit in full sun without a protective topcoat.
Nothing about the sheet is decorative. It is black, matt and plain, and most people see only the upstands and edge trims from the ground. If the look matters, the trims can be chosen in a colour to suit the fascia. Some systems offer a grey sheet, but black remains the standard because it is the most thoroughly proven.
Three ways of holding it down
There are three recognised ways to secure an EPDM membrane, and the difference decides how the roof behaves in wind.
- Fully bonded. Adhesive is rolled onto the deck and the back of the sheet, and the two are pressed together as the sheet is laid. This is the method for almost every domestic roof, because it holds the rubber flat against the deck and stops wind from lifting it.
- Ballasted. The sheet is loose-laid and held by a layer of stone or paving. It suits large commercial roofs that can carry the weight, not an extension.
- Mechanically fixed. Plates and fixings pin the membrane through to the structure, which is typical on bigger buildings where gluing every square metre is impractical.
On the roofs we survey around Basingstoke, fully bonded is the system to expect. It needs a clean, dry, sound deck, and that preparation matters more than anything printed on the roll.
How an EPDM roof is built up, step by step
A good EPDM roof is a sequence of layers, and the membrane is only the top one. Starting from the timbers, the build-up usually runs like this.
- The structural deck, normally OSB or exterior plywood on timber joists, with the boards checked for soft spots and fixed down firmly.
- A fall, set by tapered timber firrings or tapered insulation, so that water runs to an outlet instead of resting on the roof.
- A vapour control layer and insulation. In a warm roof the insulation sits above the deck, which is the usual choice on a modern extension.
- The EPDM sheet, bonded to the insulation or an overlay board.
- Edge trims, flashings and outlets, fitted to finish the perimeter and carry water into the gutter.
The deck is where cheap jobs go wrong. A damp or uneven board surface shows through the rubber, and adhesive will not grip a dusty or wet face. We lay the sheet only once the deck is dry, swept and signed off. Our guide to flat roof edge trims explains the last stage in more detail, because the perimeter is where a membrane is most often let down.
Where EPDM suits a roof, and where it does not
EPDM is at its best on a roof that is plain in shape. A rectangular extension, a flat-topped garage or a wide porch can be covered by a sheet cut to size, with few joints to fail. It also copes well with movement. Timber decks swell in a damp winter and shrink in a dry summer, and the elastic rubber follows that movement without splitting, where a rigid coating might craze.
There are cases where we steer people elsewhere. A roof full of rooflights, vent pipes and curved kerbs needs a lot of hand-formed corners, and a liquid-applied system can wrap those details more neatly. Heavy foot traffic is another. EPDM is tough, but a stone caught under a heel can mark or puncture it, so a roof used as a terrace needs walkway pads or a raised deck on supports. Oil and solvent spills, certain bituminous products and some adhesives can also attack standard EPDM, which matters on a roof with an old felt layer still beneath it. The membrane has to be separated from that with a suitable layer or the old covering stripped.
Overhanging trees need thought too. Leaf litter and moss do not harm rubber directly, but they block outlets, and standing water around a blocked outlet is the usual starting point for trouble. If you are weighing it against other coverings, our EPDM, GRP and felt comparison sets the three side by side.
Weather on the day
Adhesive and rubber are both sensitive to the conditions during laying. Rain, heavy dew or frost leaves a film of moisture on the deck that stops the glue taking, and strong wind makes a large sheet hard to control as it is unrolled. Before bonding, the sheet is normally laid out loose and left to relax, so that any creases settle and the rubber is not stretched across the roof. On a cold or damp morning we would rather move the day than glue onto a surface that will not hold, and on a small roof that delay costs far less than a failed bond. Fresh adhesive also needs time to flash off, the stage where its solvent evaporates enough to grip, and that time shortens on a hot afternoon and lengthens on a cold one.
Seams, corners and the details that decide the life of the roof
Where two sheets meet, the join is made with a purpose-made seam tape or cover strip, pressed down with a roller, never with a smear of adhesive alone. The laps are laid so that water runs over them rather than into them. Where the roof meets a wall, the membrane is turned up as an upstand, bonded to the wall face, and finished under a flashing. A flashing is a band of lead or membrane that overlaps the top of the upstand, so rain running down the wall cannot reach behind the rubber.
Internal and external corners are folded in the rubber, and a small preformed patch is added so the fold does not become a weak spot. Pipes and vents through the deck get a preformed collar, and a rooflight or lantern is dressed with an upstand formed on its kerb, which is the short upstanding timber frame the unit sits on.
Each of these is done by hand and each is a place where a rushed installer saves five minutes and leaves a leak. When we photograph a finished roof for you, the corners and collars are the pictures worth looking at.
Cost, lifespan and what the figures hide
Cost guides report a typical UK range of £80 to £120 per m² for an EPDM roof, supply and fit, and a trade-facing guide gives £70 to £100 per m². For a single garage, one guide puts a full EPDM roof at £1,200 to £2,500. These are national figures for orientation. The fixed quote comes after the survey, because the price depends on the deck, the insulation, the access, the number of penetrations and the length of edge trim as much as on the rubber.
| What drives the price | Why it moves the quote |
|---|---|
| Condition of the deck | Rotten or uneven boards must be replaced before any rubber goes down |
| Insulation | A warm roof adds boards, a vapour control layer and a deeper build-up at the edges |
| Penetrations | Each rooflight, vent or pipe is a hand-formed detail |
| Edge length | Trims and flashings are priced per metre, so a long thin roof costs more per m² |
| Access | Scaffold or a long carry for materials adds time |
On lifespan, manufacturers describe EPDM as a covering that lasts for decades when properly laid, and we would not quote a precise figure because the real life depends on the deck beneath and the care it receives. Our page on how long a flat roof lasts covers what shortens it and what stretches it.
Looking after an EPDM roof
Maintenance is modest but not zero. Clear leaves and debris from the surface and outlets at least once a year, and again after a windy autumn. Keep the surface free of solvents, paint and barbecue spills. Do not walk on the roof in hard-soled boots, and do not lean ladders against the edge trim. Look at the seams and upstands from a safe position or with a camera on a pole, and call us if an edge has lifted or a seam is open.
Small damage is usually fixable. A puncture or split is cleaned, primed and patched with a bonded piece of rubber or a self-adhesive repair tape, and a lifted flashing is re-dressed and resealed. Repairs on EPDM are far easier when the roof is clean and dry, so we do them in settled weather where we can. If a roof has more than a few separate problems, or the deck has gone soft beneath the rubber, we say so honestly, because patching over a failing deck wastes money.
Every job starts with a free survey in which we photograph your roof and show you what we find. If it is a repair, we price a repair. If a new roof is the honest answer, the price is set down on paper before work begins, and our written guarantee on the workmanship runs for ten years. Our flat roofing in Basingstoke page lists the rest of the work we do on these roofs, and the survey can be booked on 01256 213956 or over WhatsApp.
